Using Prism
If you haven't already gotten familiar with how to get audio into Prism (for ARA, just adding Prism to the track is all you need to do; for non-ARA, you have an extra step of capturing the audio first), please refer to Introduction for details.
Prism Interface
To get the most out of Prism, you'll need to be familiar with its interface, features, and abilities.

Top Bar (ARA mode)

- About - display version and license info
- Track selector - if Prism has been added to multiple tracks, you can switch among them using this dropdown.
- Follow DAW selection - when enabled, Prism will automatically switch to the track that is currently selected in the DAW.
- Algorithm selector - this selects the algorithm that Prism uses to determine what notes are playing and convert them into midi. Select the algorithm that best represents your audio. When changing the algorithm, Prism will automatically begin processing the audio with it.
- Re-analyze audio - Use this if you've modified the midi in Prism's midi editor and want to go back to the original analyzed audio.
- Snap selector - the snap setting used by Prism's midi editor
- Loop toggle - control looping during playback
Top Bar (non-ARA mode)
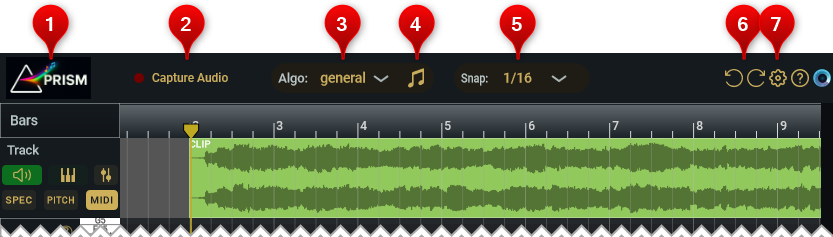
- About - display version and license info
- Capture Audio - this button is used to "arm" Prism for capturing the audio when the DAW starts to play. Once audio capture has started, click this button again to stop capturing.
- Algorithm selector - this selects the algorithm that Prism uses to determine what notes are playing and convert them into midi. Select the algorithm that best represents your audio. When changing the algorithm, Prism will automatically begin processing the audio with it.
- Re-analyze audio - Use this if you've modified the midi in Prism's midi editor and want to go back to the original analyzed audio.
- Snap selector - the snap setting used by Prism's midi editor
- Undo & Redo - undo and redo midi editing actions
- Settings - display the settings (change colors and mouse behavior)
Under the top bar is the Bar track
Bar Track
The Bar Track displays the bars for the audio in Prism.
In ARA mode, you can position the DAW's playhead by clicking in the bottom half of the Bar Track; you can also create a loop by dragging in the top-half of the Bar Track. Double-click the yellow loop markers to disable the loop; you can also toggle looping via the Loop button in the toolbar.
Waveform Track
The Waveform Track shows the audio waveform for all the clips in the track that Prism is assigned to, along with controls for playback and displaying content in the editor view.

-
Shows the Track name assigned in the DAW
-
The first button enables playback of the original audio. The second button enables playback of the midi notes through Prism's built-in piano sampler. The third button displays controls for adjusting the audio and midi volume levels and panning.

These controls are useful if you want to ensure an accurate midi transcription. By disabling Audio playback and enabling Midi playback you hear the midi results re-synthesized as a piano (keep in mind that Prism's piano sampler is very rudimentary and any plugin Instruments you have will likely sound much better).
You may find it useful to enable Audio playback but pan it to the far left, and pan the Midi to the far right--best to wear headphones when doing this.
- The third row of three buttons control what is displayed in the editor area. In order, these buttons are:
- SPEC - displays spectrogram of the audio track. This is sometimes useful to get a finer view of pitch contours and to makes things like vibrato and pitch bends visual.
- PITCH - this is essentially a processed spectrogram that has been detangled by assigning the overtones to individual notes. It is sometimes useful to compare it with the midi notes and may make it easier to find missing midi notes.
- MIDI - shows the midi notes. These notes are fully editable--you can move, quantize start and end times, add, delete, and more.
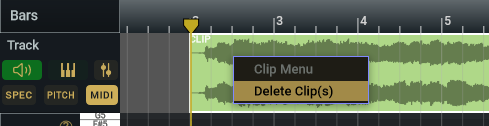
Deleting an Audio Clip
In ARA mode, deleting an audio clip in your DAW will remove it from Prism.
In non-ARA mode, delete an audio clip in Prism by right-clicking on the clip and selecting "Delete Clip" from the pop-up menu.
The Editor
The editor area consists of a few controls and an area to edit the midi notes.

-
"?" - This is just a handy tooltip that displays various methods to scroll and zoom within Prism's editor. (It would really be nice if there were standard agreed upon controls/keys for zooming and scrolling that every DAW would use!).
-
Drag MIDI - just click on this button and drag-n-drop it into your DAW to add the midi to your project. Click SAVE MIDI to save the midi to an external midi file.
-
Sensitivity - this knob gives you some degree of control over how strict Prism is in declaring a detection as a midi note. Higher values make the algorithm more selective about notes and will result in fewer notes displayed, while lower values will add in more notes. Double-click the control to reset back to the default sensitiviy setting for the current algorithm.
In the video below, we slowly change the Sensitivity knob. Notice how notes dissapear at higher sensitivity values and are added as senstivity is decreased.
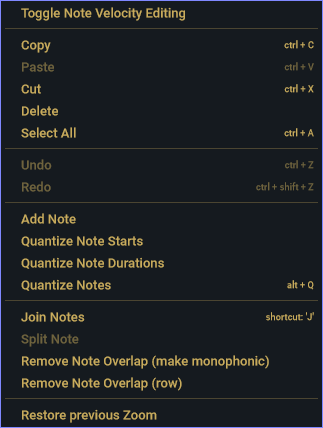
Using the Editor
The midi editor works like every other midi editor. To see a list of commands, right-click in the editor. Most commands require one or more notes to be selected before they are activated.
In this short video, we use the mouse to select a group of notes, and then quantize them.
Key and Mouse Actions
| Action | Mouse/Keys |
|---|---|
| Pan/grab | Ctrl + Shift + left-mouse-drag |
| Scroll horizontally | mouse-wheel or trackpad swipe left/right |
| Scroll horizontally | ←, → |
| Scroll horizontally | bottom scrollbar |
| Zoom horizontally | Shift + mouse-wheel or trackpad pinch |
| Zoom horizontally | ↑, ↓ |
| Zoom horizontally | zoom-slider to right of bottom scrollbar |
| Zoom vertically | Ctrl + Shift + mouse-wheel or pitch |
| Zoom vertically | zoom slider below vertical scrollbar |
| Zoom into a specific region | Ctrl + Alt/Option + mouse-drag rectangle to zoom into |
| Add midi note | Alt/Option + click |
- Note: You can change the scroll-wheel direction and action (scroll or zoom) in Settings.
Use the Approprite Algorithm
Prism has three algorithms to get the best results for a given audio recording. Selecting the best one is usually trivial based on the instrument in the recording.
- general - this is the algorithm to use unless you specifically have content addressed by one of the other algorithms. It will analyze both mono and polyphonic data sources and is the one to use for acoustic guitar, clean guitar, bass, keyboard type instruments, saxophone, trumpet, violin, etc.
- guitar dist - distorted guitars are problematic due to the large variance in overtones that distortion effects generate so it gets its own algorithm.
- grand piano - use this algorithm if you are processing a high quality solo acoustic piano performance. If your track contains a piano stem that has been separated from a mixed track or a lower quality piano, then general will probably give better results. It doesn't hurt to try both and choose the one that does the best.
Changing Color of Waveforms and Midi Notes
For ARA mode, the color of the waveform and midi notes are determined by the DAW's track color. So to change the color Prism uses, simply change the track color in the DAW.
For non-ARA mode, select colors for the waveform and midi notes in the Settings dialog.