Accelerate Stem Separation with an NVidia GPU
In this post, we'll go through the steps to setup an NVidia graphics card that supports CUDA to accelerate stem-separation in Song Master.
Note that this is an "unofficial" feature and we cannot provide support if you run in to problems. We have put together this guide to help you if you are adventurous and want to give it a try—but you are on your own!
Base Requirements
The base requirements for Song Master to use an NVidia GPU to accelerate stem separtion are:
-
Windows os
-
Nvidia graphics card that supports CUDA (should probably have > 4GB memory)
-
Versions equal or greater to Song Master Pro 2.6 or Song Master 4.6
What Can I Expect?
The performance improvement greatly depends on the graphics card you have installed on your system. For instance, the following table shows a couple of results using an expensive GPU and an older GPU. Times shown are for a 4:00 min song using our 4-stem (vocal, bass, drums, other) and 6-stem (vocal, bass, drums, guitar, piano, other) models:
| CUDA 4-stem | CPU-4-stem | CUDA 6-stem | CPU 6-stem | |
|---|---|---|---|---|
| Win1: GeForce RTX 3090 24Gb | 5 secs | 0:48 | 6 secs | 0:40 |
| Win2: GTX 970 4Gb | 3:11 | 1:29 | 19 secs | 1:17 |
Win1 is fast desktop system with an expensive graphics card. Win2 system has an older graphics card with minimal memory.
Note that the time for Win2 using the 4-stem model is considerably longer than it took when using just the CPU--this indicates that the amount of RAM is an important factor in performance with GPU. Interestingly, it took just 19 secs using the 6-stem model.
3rd Party Software Required
In order for Song Master to accelerate stem separation, you will have to install 3rd party software from Nvidia and Microsoft. We provide the following notes but you may also want to refer to NVidia's documentation for installing CUDA and cuDNN: cuDNN installation
To Enable Song Master to accelerate Stem Separation the following steps are required:
-
Be sure that you have an Nvidia graphics card that has support for CUDA and that you have the latest Nvidia driver installed
-
Install CUDA 11.6 or 11.8
-
To download the CUDA installer, go here: https://developer.nvidia.com/cuda-toolkit-archive
-
Click CUDA Toolkit 11.8.0 and select Windows, x86_64, then your version of Windows, and Download the exe.
-
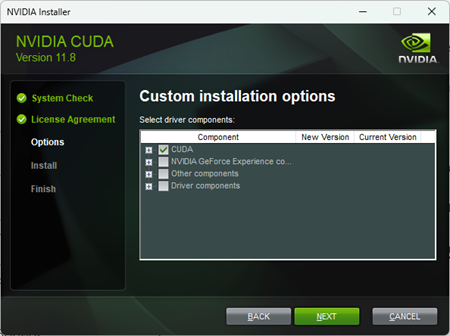
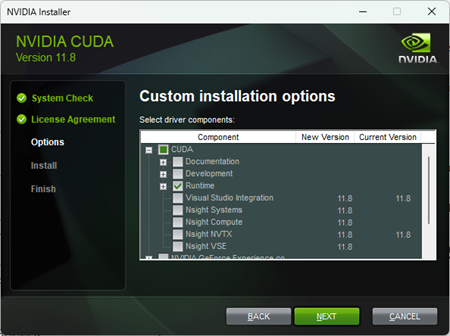
Run the installer. You can use either the Express (installs all the software) or Custom.
noteNote, we only require that the Runtime components are installed, so you can select Custom install and unclick all options except Runtime. The other options install software for developers.
-
-
Install Nvidia's CuDNN 8.9 for CUDA 11
This download doesn't have an installer so you MUST follow the steps here to create the proper directory and add it to PATH.
-
To download the cuDNN zip, go here: https://developer.nvidia.com/rdp/cudnn-archive
- Click Download cuDNN v8.9.7 for CUDA 11.x (be sure that you click the one for CUDA 11.x and not 12.x!)
- Click Local Installer for Windows (Zip)
-
Unzip the downloaded cuDNN zip (cudnn-windows-x86_64-8.9.7.29_cuda11-archive.zip)
-
Create the following folder on your computer:
C:\Program Files\NVIDIA GPU Computing Toolkit\CUDNN\v8.9
-
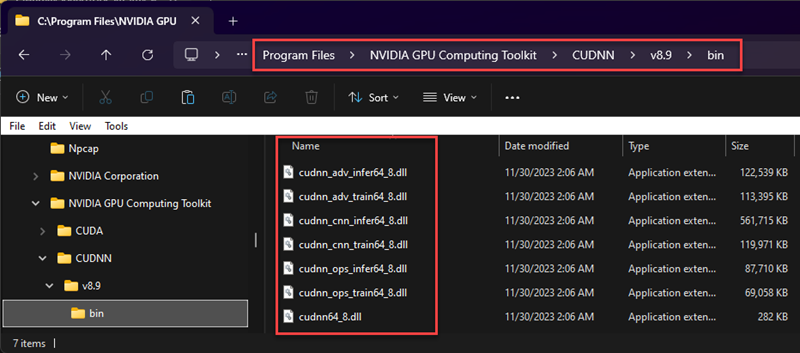
Copy the unzipped files in the bin directory to this directory. You should see 7 files in C:\Program Files\NVIDIA GPU Computing Toolkit\CUDNN\v8.9\bin:
-
-
Update PATH System Environment Variable to include both the CUDA and cuDNN bin directories
- Press the Windows key,and type "Edit the system environment variables" in the search box, press Enter.
- In the System Properties dialog, click the Environment Variables.. button near the bottom of the dialog.
- In the bottom list of System variables, double-click on the line for Path
- Add entry for the CUDA bin directory.
Note: the CUDA installer may add the toolkit to the PATH, if it didn't, then you need to add it manually.
In the Edit environment variable dialog:
-
click New and enter
"C:\Program Files\NVIDIA GPU Computing Toolkit\CUDA\v11.8\bin"
-
- Add entry for the cuDNN bin directory.
In the Edit environment variable dialog
-
click New and enter
"C:\Program Files\NVIDIA GPU Computing Toolkit\CUDNN\v8.9\bin"
-
-
Download ONXX Runtime v1.13.1
-
go here: https://github.com/microsoft/onnxruntime/releases/tag/v1.13.1
-
scroll to the BOTTOM of page for Assets/downloads
-
download: onnxruntime-win-x64-gpu-1.13.1.zip
-
unzip
-
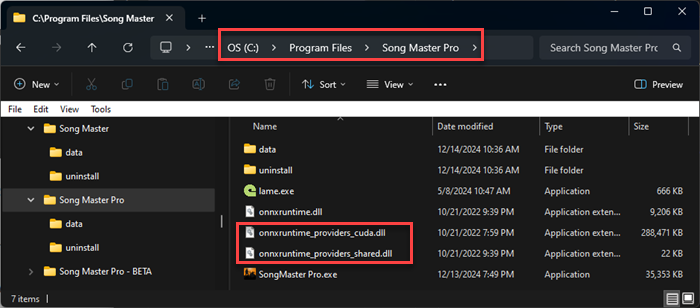
We just need two of the files in the lib folder. So, copy the two .dlls:
- onnxruntime_providers_cuda.dll
- onnxruntime_providers_shared.dll
from the lib folder to the Song Master dir C:\Program Files\Song Master Pro (or C:\Program Files\Song Master for non-pro version). These files need to be in the same directory as onnxruntime.dll from Song Master's dir:
-
-
Finally, goto Settings in Song Master and check the Use GPU for DNN processing
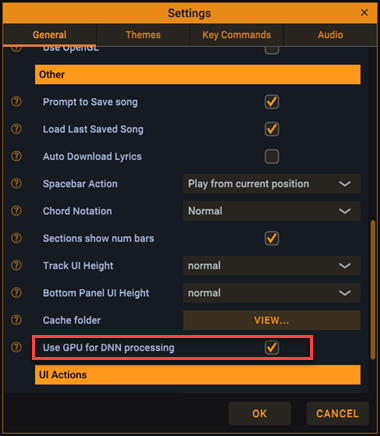
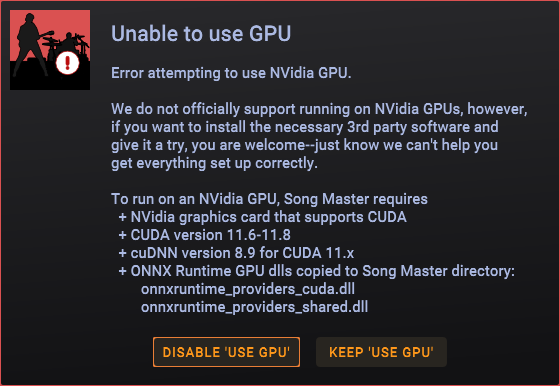
If everything is installed correctly, then the next time you go to Generate Stems you should see a performance improvement. However, if you see the following error, then something is not installed correctly. Go back and make sure that you've precisely followed the above instructions and installed the correct versions of each software.
