Using Prism Drums
If you haven't already gotten familiar with how to get audio into Prism Drums, please refer to Quick Start. In ARA mode, your DAW supplies the audio directly. In non-ARA mode, you first capture the audio while the DAW plays.
Prism Drums Interface
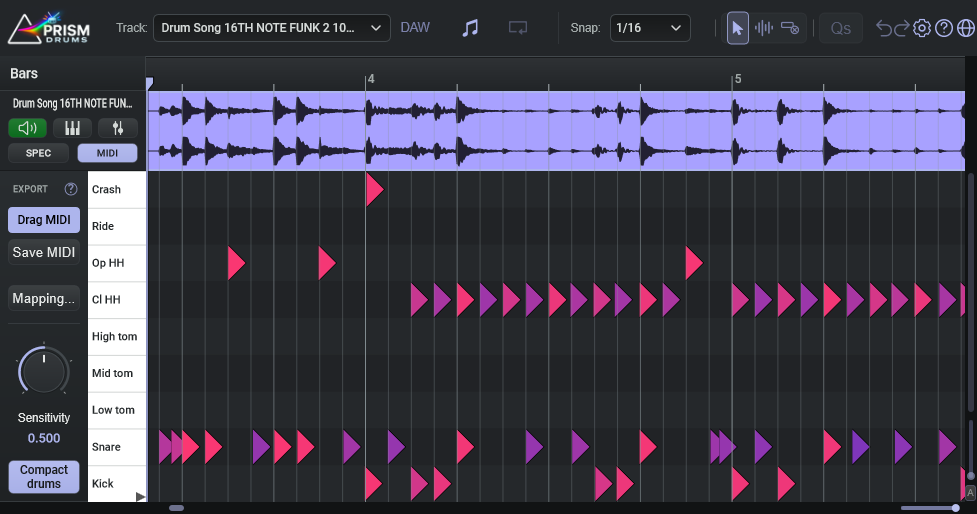
Prism Drums converts drum audio into editable MIDI hits. The interface consists of a top bar, a Bar Track, a Waveform Track, and a MIDI editor with drum rows and export controls.
Top Bar (ARA mode)
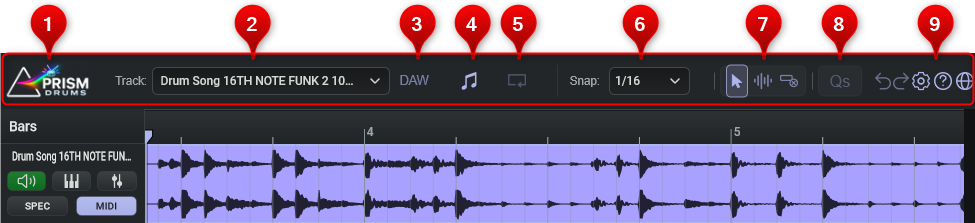
- About — click the Prism Drums logo to display version and license information.
- Track selector — if Prism Drums has been added to multiple tracks, choose which track to view and edit.
- Follow DAW selection (DAW) — automatically follow the track selected in your DAW. If this is not enabled, select the track to edit from the Track selector.
- Re-analyze audio — analyze the current track again and replace its MIDI with newly detected hits. If you have edited the notes, Prism Drums asks for confirmation before replacing them.
- Loop toggle — enable or disable looping when supported by the ARA host.
- Snap selector — choose the timing grid for editing and quantizing hits.
- Mouse Tools - There are three mouse tools, select the appropriate one for your task: General editing, edit velocities, delete notes
- Quantize Starts - this button will quantize the start time of all selected notes
- Misc - these buttons are: Undo, Redo, Settings, Help, goto our website
Top Bar (non-ARA mode)
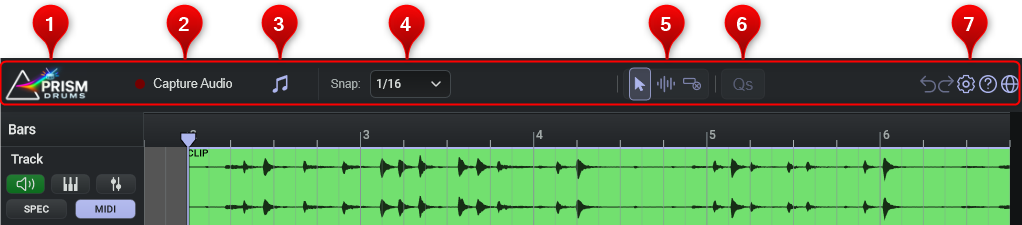
- About — click the Prism Drums logo to display version and license information.
- Capture Audio button. Click it to arm Prism Drums, then start playback in your DAW. Click Stop Capture when you have captured the section you want to transcribe.
- Re-analyze audio — analyze the current track again and replace its MIDI with newly detected hits. If you have edited the notes, Prism Drums asks for confirmation before replacing them.
- Snap selector — choose the timing grid for editing and quantizing hits.
- Mouse Tools - There are three mouse toolls, select the appropriate one for your task: General editing, edit velocities, delete notes
- Quantize Starts - this button will quantize the start time of all selected notes
- Misc - this buttons are: Undo, Redo, Settings, Help, goto our website
Capture Audio
For hosts that do not support ARA, then you must first capture the audio into Prism Drums so it can get access to the audio and analyze it. To capture audio:
- Position the DAW's playhead to the start of the audio you want Prism Drums to convert
- Press Capture Audio button.
- Start playback in your DAW.
- When all of the audio data you want analyzed has played, stop the DAW playback and click Stop Capture.
Editing Tools
Various buttons in the Top toolbar area are used to edit the midi, change UI settings, and provide extra help.
| Control | What it does |
|---|---|
| Smart | Select, add, and move drum hits. |
| Velocity | Select hits and drag up or down on a hit to change the selected hits' velocities. |
| Delete | Click a hit to delete it. This tool stays active until you choose another tool. |
| Qs | Quantize the start times of selected hits to the current timing grid. |
| Undo / Redo | Undo or redo MIDI edits. |
| Settings | Change the theme, mouse behavior, and other preferences. |
| Help | Open editing help and the documentation link. |
Bar Track

The Bar Track displays the bars and beats of your audio.
In ARA mode, click in the bottom half of the Bar Track to position the DAW's playhead. Drag in the upper loop-selection strip to create a loop. Drag the loop's start or end handle to change its boundaries, or drag its center marker to move the whole loop. Double-click a loop marker to toggle looping.
Playhead and loop control depend on your DAW's ARA support. In non-ARA mode, use the DAW's transport and loop controls.
Waveform Track
The Waveform Track shows the audio clip(s) for the current track. Its header displays the track name and controls for playback and editor visibility.

(1) - Track name
(2) - Comparing Audio and MIDI
- The Audio playback button enables or mutes the original audio.
- The MIDI playback button enables or mutes the detected hits through Prism Drums' built-in drum sampler.
- The mix controls button opens separate volume and pan controls for audio and MIDI.

To check a transcription, mute the audio and listen to the MIDI by itself, then compare it with the recording. You can also enable both, pan the audio left and the MIDI right, and listen on headphones. The built-in drum sampler is sufficient for checking timing and drum identities; export the MIDI to your drum instrument to hear the finished sound.
- Double-click a volume fader to reset it to unity gain, or double-click a pan slider to center it.
(3) - Display Buttons
- Spec — show or hide the audio spectrogram. This displays the audio's frequency content and can help you inspect transients.
- Midi — show or hide the editable drum hits.
These buttons change what is visible; use the separate playback buttons above these to control what you hear.
(4) - Audio Clip(s)
The audio clip(s) waveforms that Prism Drums has analyzed are displayed here.
Deleting an Audio Clip
In ARA mode, delete the clip in your DAW to remove it from Prism Drums.
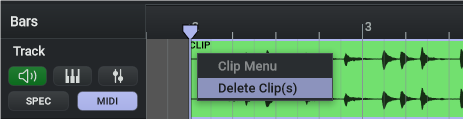
In non-ARA mode, right-click a captured waveform clip and choose Delete Clip(s). To delete several clips, select them with Shift-click before opening the menu.
The Editor
Each drum hit appears as a half-diamond at its start time. Its row identifies the drum, and its color indicates velocity using the current theme. Hover over a hit to see its MIDI note and velocity.
Editor Side Panel
The controls to the left of the drum rows include Drag MIDI, Save MIDI, Mapping..., Sensitivity, and Compact drums.
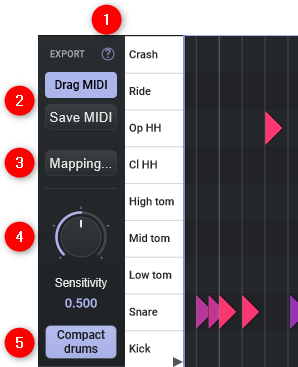
- ? - Displays a pooup window of common scrolling and panning key and mouse combinations
- Drag MIDI and Save MIDI - These two buttons are used to drag and save the midi that is displayed in the editor, respectively. Simply click the the Drag MIDI button and drag into your DAW and drop it on a MIDI track.
- Mapping - By default, Prism Drums will assign the drum classes following General Midi standards, however, it is common for drum VST instruments to assign their drum components different midi values. Click this button to change the mapping Prism Drums uses to match your drum instrument.
- Sensitivity - this knob controls how selective Prism Drums is when detecting hits. The default value, 0.5, usually provides the best results, however, you may find that your drum content is needs to allow more or less midi notes.
- Higher values produce fewer hits and can help remove false detections.
- Lower values produce more hits and can help recover quieter hits.
- Double-click the knob to restore the default value of 0.5, which uses the calibrated detection thresholds.
Sensitivity adjusts detection across all nine drum types. Set it before making detailed manual edits, since changing detection settings regenerates the detected notes.
- Compact Drums - this compresses the editor into nine named lanes, showing only the drum types Prism Drums detects.
All nine lanes fit the editor height, so vertical scrolling and zooming are disabled. Horizontal scrolling and zooming still work. Moving a hit vertically changes its drum type; for example, drag a hit from the Snare lane to the Kick lane to correct a misidentified hit.
Turn Compact drums off to use the full MIDI-row view. This is useful for adding or inspecting drum notes outside the nine detected types and for adjusting vertical zoom. Switching views preserves your notes. Notes outside the nine lanes are hidden in compact view and remain in MIDI playback and export; turn compact view off to edit them.
Using the Editor
Use the Smart mouse tool for normal editing.
Select Drum Hits
Click a hit to select it, Shift-click to add or remove hits from the selection, or drag across empty space to select a group. Drag a selected hit to move the group in time or between drum rows.
To correct a transcription, delete unwanted hits, add missing ones, move misidentified hits to the correct row, and adjust timing or velocity as needed. Right-click in the editor to see the available commands. Commands that act on a selection require selected hits.
To select a row, Shift-click the row label to add all hits on that row to the current selection, which is useful if you need to globally adjust velocities.
Add Drum Hits
Add MIDI notes by Alt + mouse-click at the time you want the note to start.
Snapping
When dragging and adding notes, the current snapping setting (see its dropdown in the top toolbar) is used. Temporarily disable snapping by holding Shift when dragging note(s).
Quantizing Hits
Quantizing aligns the selected hits' start times.
- Choose a grid value in the Snap selector, such as 1/16.
- Select the hits you want to align.
- Click Qs, or choose Quantize Starts from the editor's context menu.
Editing Velocity
Choose the Velocity tool, select one or more hits, and drag up on a hit to increase their velocities or down to decrease them. The hit colors update as the velocities change. Choose Smart when you want to move hits again.
Drum Mapping Dialog
Different drum VSTi instruments may use custom MIDI note numbers for their sounds. Click Mapping... in the editor sidebar to open Drum Mapping and choose the note numbers used by Save MIDI and Drag MIDI.
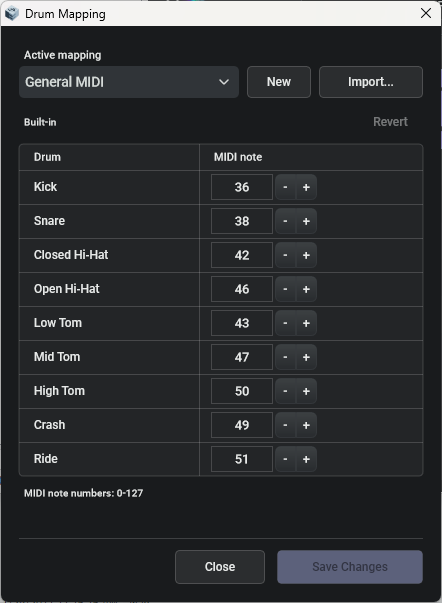
Mapping affects exported MIDI. The editor's drum identities and the built-in audition sounds stay the same, so you can export the same performance for different drum instruments without moving hits between rows.
Choosing a Preset
Choose a preset from Active mapping. The selected preset becomes active for subsequent exports. The default is General MIDI.
Creating a Custom Mapping
- Select the preset closest to your drum instrument's mapping.
- Set each drum's destination MIDI note using its numeric field or the + and − buttons. Values range from 0 to 127.
- Click New to save the displayed settings as a custom mapping.
- Enter a name and, optionally, a description, then save. The new mapping becomes active.
Built-in presets are preserved; use New to save a custom copy. To update an existing custom preset, select it, edit its note numbers, and click Save Changes. Use Edit details... to change its name or description, or New to make an independent copy.
The dialog marks Unsaved changes and shows the previous values beside edited rows. Revert discards pending edits and reloads the active saved mapping. Save your changes before exporting; unsaved note-number edits do not affect exports. Closing or switching mappings with pending edits prompts you to discard them or keep editing.
General MIDI Note Numbers
| Drum | General MIDI note |
|---|---|
| Kick | 36 |
| Snare | 38 |
| Closed hi-hat | 42 |
| Open hi-hat | 46 |
| Low tom | 43 |
| Mid tom | 47 |
| High tom | 50 |
| Crash | 49 |
| Ride | 51 |
The mapping covers these nine drum types. Other MIDI notes you add in the full-row view retain their existing note numbers when exported.
Importing and Sharing Custom Mappings
Click Import... to load a custom mapping JSON file. An imported single mapping becomes active automatically. If a file contains several mappings, choose the one you want from Active mapping after import.
Custom mappings are saved as individual JSON files in:
- macOS:
~/Library/Application Support/AurallySound/DrumMidiMappings/ - Windows:
%APPDATA%\AurallySound\DrumMidiMappings\
Share a mapping by copying its JSON file from this folder. On the receiving computer, use Import... to add it as a custom copy.
Exporting MIDI to DAW or MIDI File
Choose the desired Active mapping, then use either export method:
- Drag MIDI — drag from the sidebar's MIDI drag control into a MIDI or instrument track in your DAW.
- Save MIDI — choose a filename and save an external MIDI file, then import it into your DAW.
Both methods export the current track's MIDI using the active drum mapping. Drum notes use MIDI channel 10. Load your drum instrument on the destination track and make sure it accepts that channel.
If you change the mapping later, export again to create MIDI with the new note assignments. MIDI already imported into your DAW keeps its previous assignments.
Changing Colors and Mouse Behavior
Open Settings > General and choose an Appearance > Theme to change the interface accent and MIDI velocity colors. Theme changes preview immediately. Click OK to keep them or Cancel to restore the previous theme.
In ARA mode, waveform colors follow the DAW's track color. In non-ARA mode, use Waveform Color in Settings. MIDI hit colors reflect velocity using the selected theme.
The General settings also include Mouse Wheel Action and Reverse mouse wheel. In non-ARA mode, you can set Capture Audio Path and open the captured-audio folder.
Key and Mouse Actions
Control below means the Control key on either platform. Option on macOS corresponds to Alt on Windows. Click inside the editor before using keyboard shortcuts; some DAWs require keyboard focus to be sent to the plug-in.
| Action | Mouse / Keys |
|---|---|
| Select a hit | Click the hit |
| Add or remove a hit from the selection | Shift-click the hit |
| Select a group | Drag across empty editor space |
| Add a group to the selection | Shift-drag across empty space |
| Add a hit | Option/Alt-click empty space |
| Move selected hits | Drag a selected hit with Smart |
| Move hits between rows while keeping their timing | Command-drag on macOS; Control-drag on Windows |
| Temporarily bypass snap when moving or adding | Hold Shift during the gesture |
| Select all hits | Command+A on macOS; Control+A on Windows |
| Delete selected hits | Delete / Backspace |
| Undo | Command+Z on macOS; Control+Z on Windows |
| Redo | Command+Shift+Z on macOS; Control+Shift+Z on Windows |
| Pan / grab the view | Control+Shift+left-mouse-drag |
| Scroll horizontally | Mouse wheel by default, Left/Right Arrow, or bottom scrollbar |
| Zoom horizontally | Shift+mouse wheel by default, Up/Down Arrow, or horizontal zoom slider |
| Zoom with a trackpad | Pinch; hold Shift for horizontal zoom only |
| Zoom vertically in full MIDI-row view | Control+Shift+mouse wheel or Control+Shift+pinch; vertical zoom slider |
| Zoom into a region | Control+Option/Alt-drag a rectangle |
| Restore the previous rectangle zoom | Control+Option/Alt-click, or context menu > Restore previous Zoom |
In Settings, you can change Mouse Wheel Action between Scroll and Zoom and enable Reverse mouse wheel. Shift temporarily switches between horizontal scrolling and zooming. In compact view, zoom gestures retain all nine lanes and change the time range only.