The Bars Track
Overview
Not surprisingly, the Bars track displays the locations of every measure in a song. It is also used to define loop regions (click-and-drag in the top-half of the track) and to position the playhead (click in the bottom half of the track).
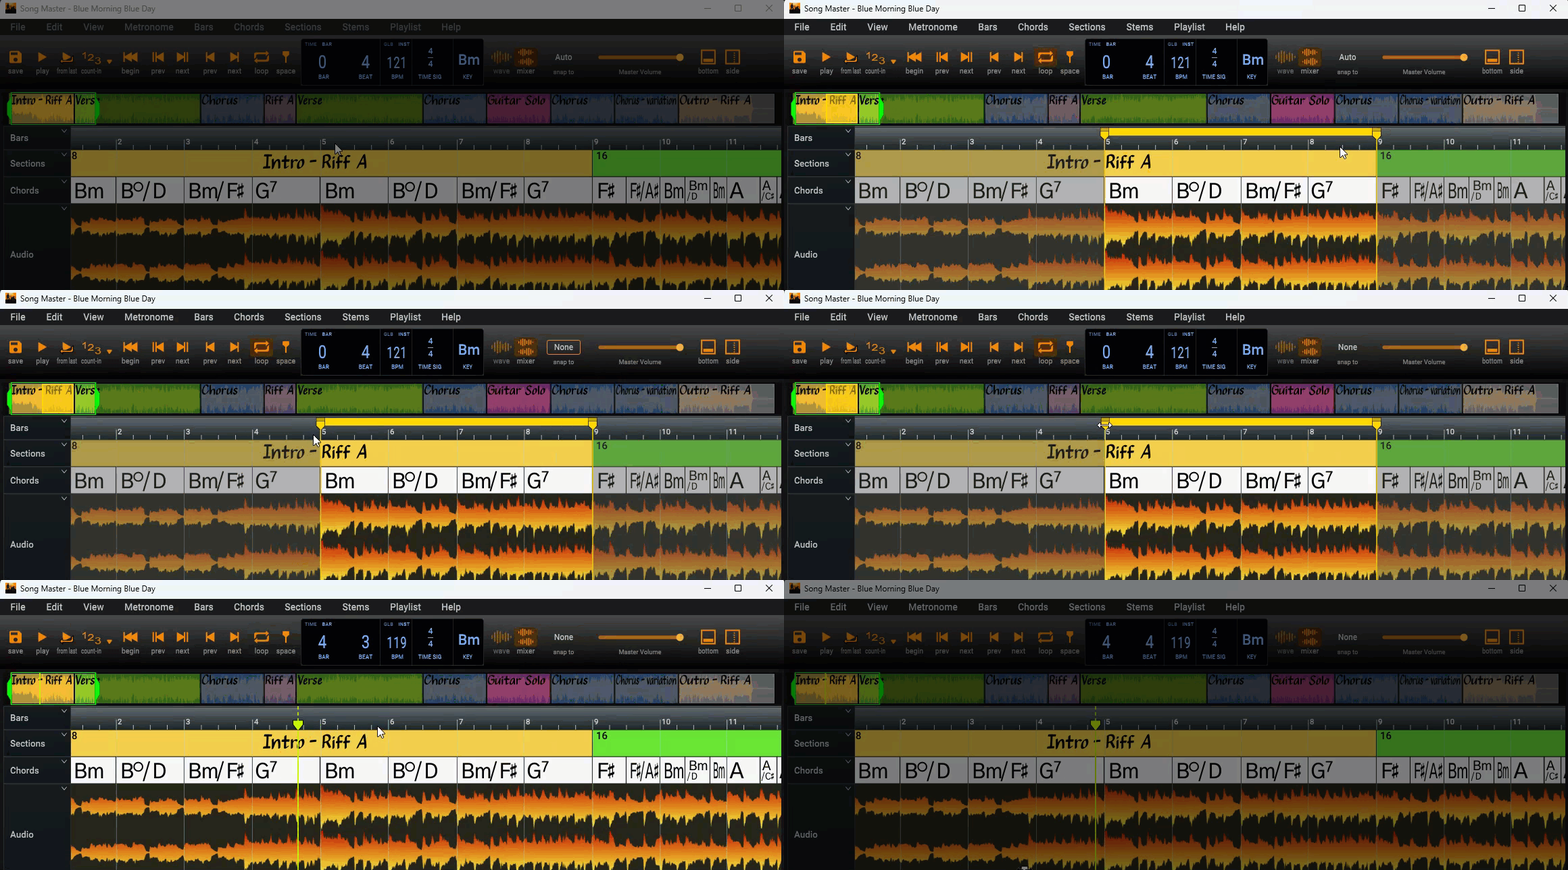
When a new audio file is opened, Song Master analyzes it and determines the beats, bar positions, and overall time-signature. Song Master usually does an excellent job determining these, however, when it doesn't there is usually a quick fix.
We'll start with the more common errors and get into more complex scenarios later.
Quick Modifications
Align Bars to Beat One
If Song Master didn't correctly identify the beat that the bars start on, use the Shift Beats Left and Shift Beats Right commands on the Bar menu. These commands shift the start of all bars to the prev/next beats.
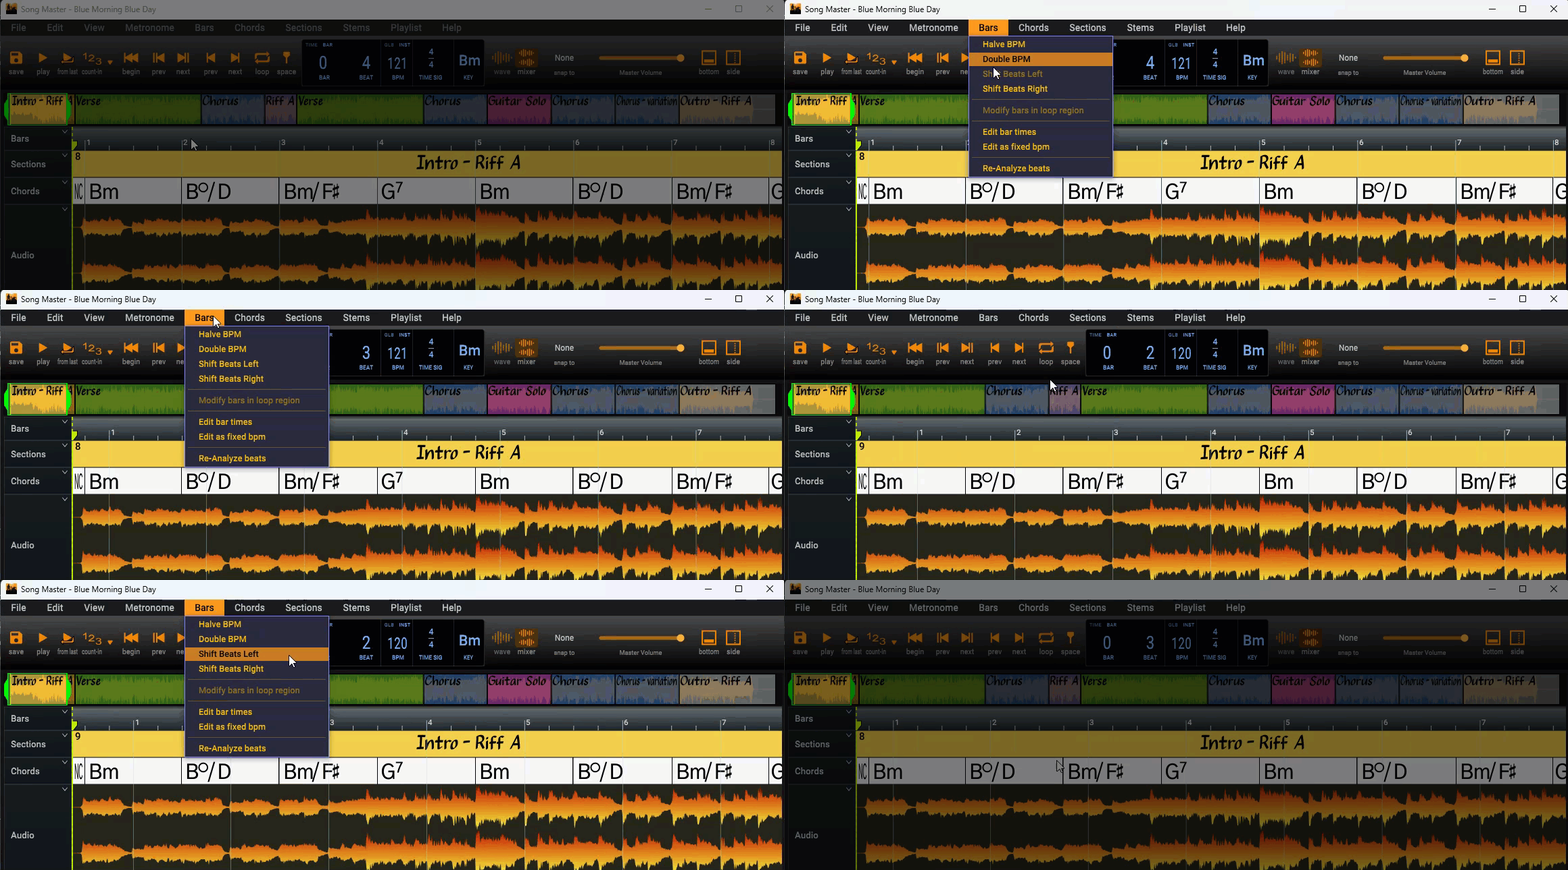
You can also use the buttons in the Beats section of the Analyzer's Tab (in the Bottom Panel).
If the tempo is twice as fast or half as slow
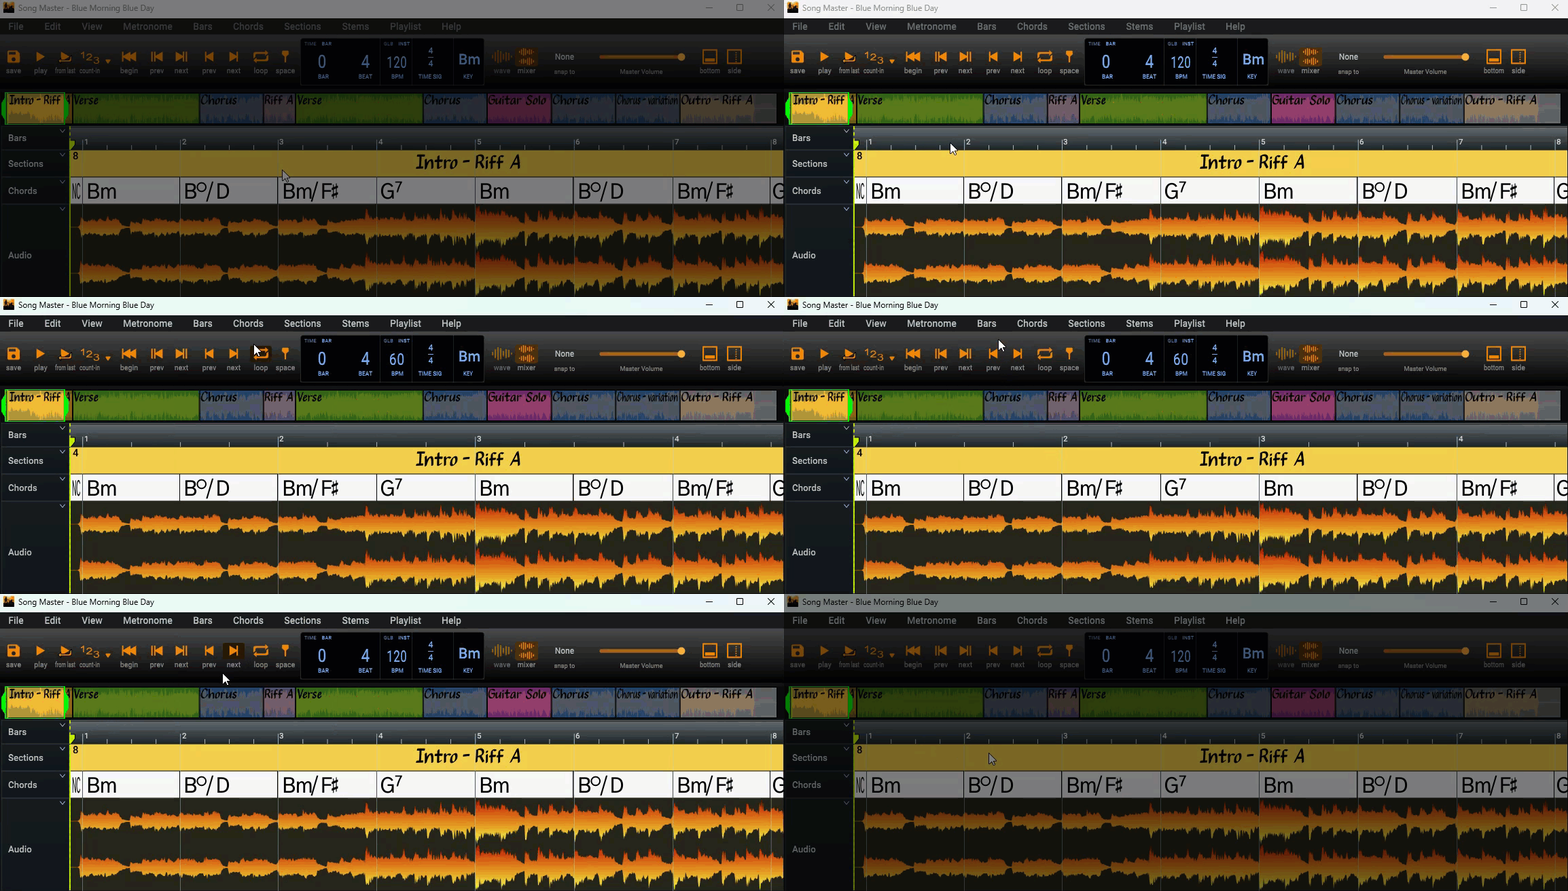
Sometimes Song Master will say the tempo is two-times as fast as you think it should be or it may say it is half as slow as you'd like. You can quickly fix these problems by using the commands HALVE BPM and DOUBLE BPM on the Bar menu.
Drop Note Markers and Convert them to Bars
This method gives you absolute control over each bar position. Start by making sure the Notes Track is visible (View | Note Track), then with the song playing:
- Drop Note markers (press N key) at the positions you determine for the bars (Note markers are added to the Notes track).
- Adjust the timing of any Note markers on the Notes track.
- Once you have added all the Note markers, select them (to select all Note markers press ctrl+a or use the mouse to select the first marker and then shift+click the last marker).
- Position the mouse over a Note marker, then Right-click in the Notes track and select Convert selected markers to bars. Song Master will create a bar at the position of each marker.
- Delete the Note markers
These steps are demonstrated in the following video:

This method works to correct a small section or the entire song.
This method is ideal to fix areas where the rubato was to great for Song Master to track.
Changing Number of Bars in a Region
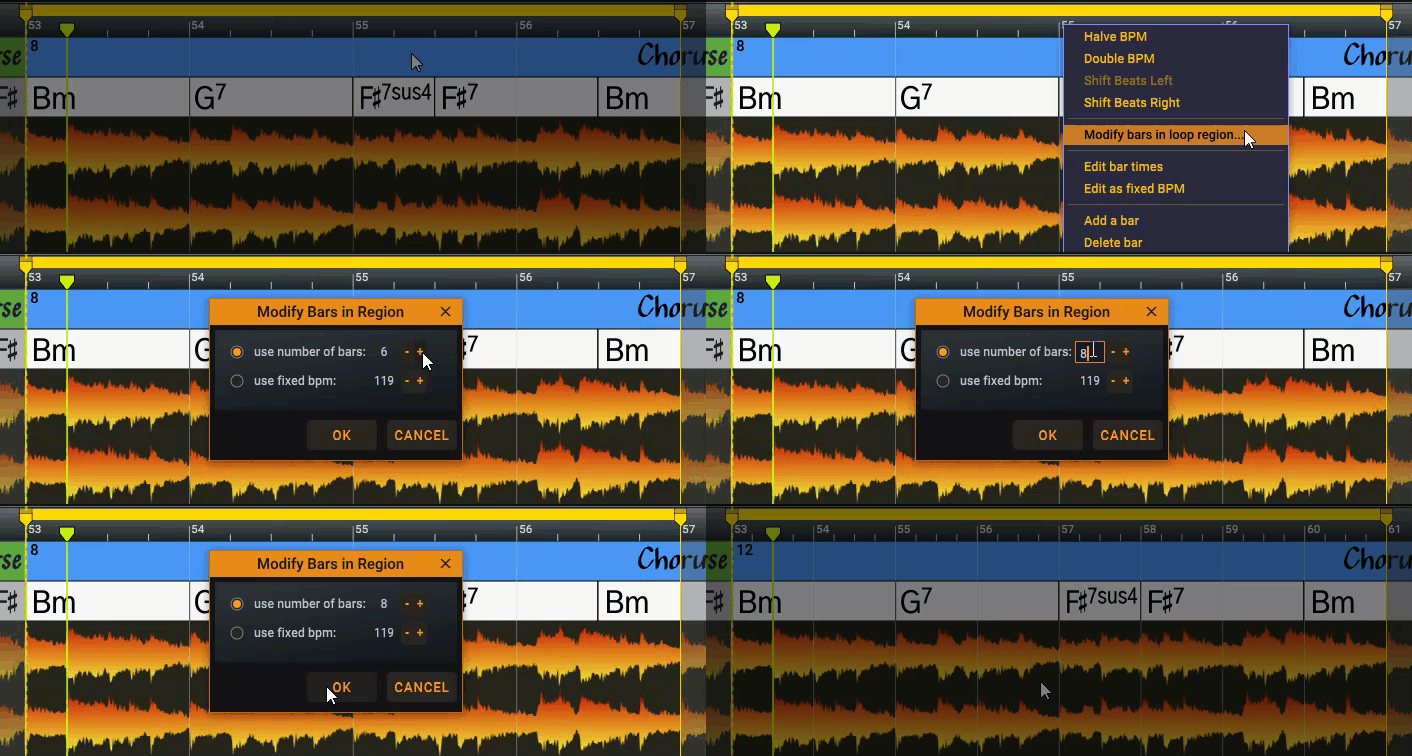
This technique allows you to easily change the number of bars in a span of time. Start off by creating a loop that encompasses the range of time to modify. Then right-click in the bar track and select Modify bars in loop region... to display a dialog with options on how to modify the bars in the loop.
If you know the number of bars in the region, then click use number of bars and enter the number of bars in the edit field to the right. Song Master will calculate the bpm that will fill the loop region with the number of bars requested:
You can also use the option in the dialog to specify the bpm for the loop region. If this is selected, Song Master will determine the appropriate bar positions using the specified bpm. When doing this, it's common to have a bar at the end of the loop region where it wasn't possible to fit a full bar at the requested bpm. In this case you will need to adjust the last bar position (go into Edit bar times mode (discussed further down), hold Shift and click-and-drag the last bar to desired time) or delete the last bar.
Edit Bar Times Mode
If you need finer control over the placement of bar lines you can use the Edit bar times option found on the menu for the Bars track. You can access this menu by right-clicking anywhere on the Bars track or by clicking the little rectangle on the Bars track header column. You can also enter and exit Edit bar times mode from the Bars menu in the main menu.
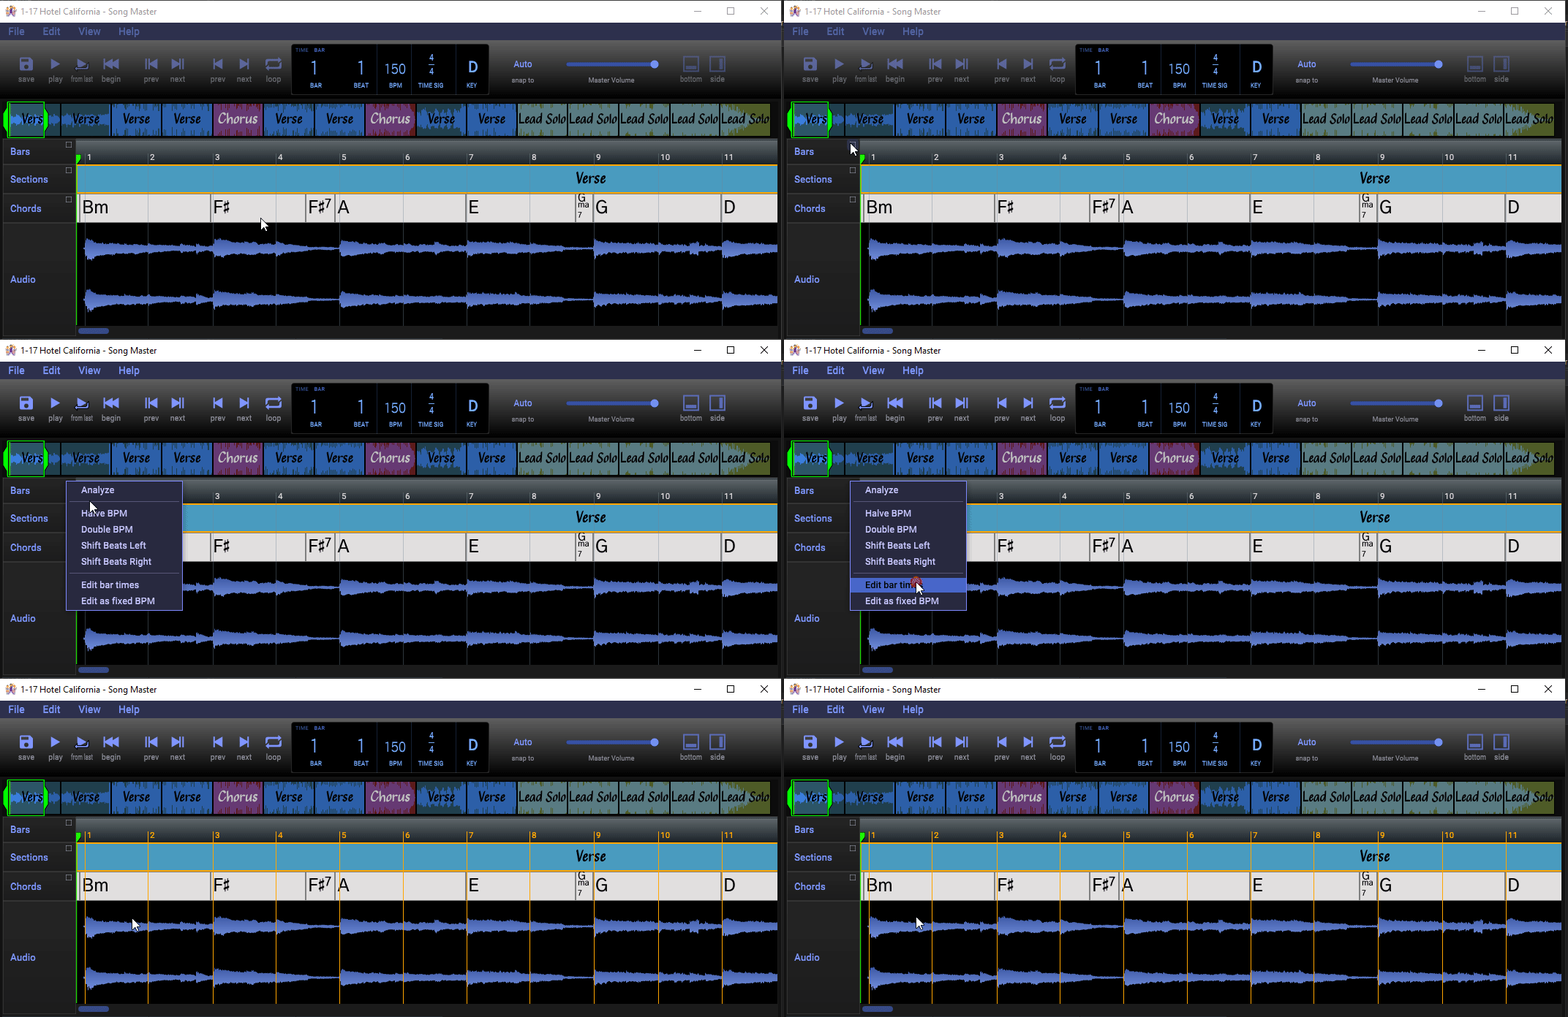
When in Edit bar times mode, the bar lines turn orange. There are three editing options available:
-
Adjust just one bar line - Position mouse over the bar line, hold down Shift and click-and-drag mouse to position the bar.
-
Adjust ALL bars - Position mouse over a bar, then click-and-drag to move all bars. Notice that the mouse cursor has two white blocks on either side of the bar line to indicate that any changes you make will change all the bars to the left and to the right.
-
Move ALL bars to the Right - Position mouse over a bar, hold down Ctrl+Alt (option+command on mac) and click-and-drag mouse to move all the bars to the right. Notice that the mouse cursor has just one white block on the right side of mouse to indicate that only the markers to the right will be moved.
Zoom in for finer control over timing.
Example: Bar Editing
In the following video we:
- enter Edit bar times mode
- reposition all the bars
- zoom in
- reposition again with finer control over timing
- reposition all bars from bar 4 to the end
- finally, we exit Edit bar times mode
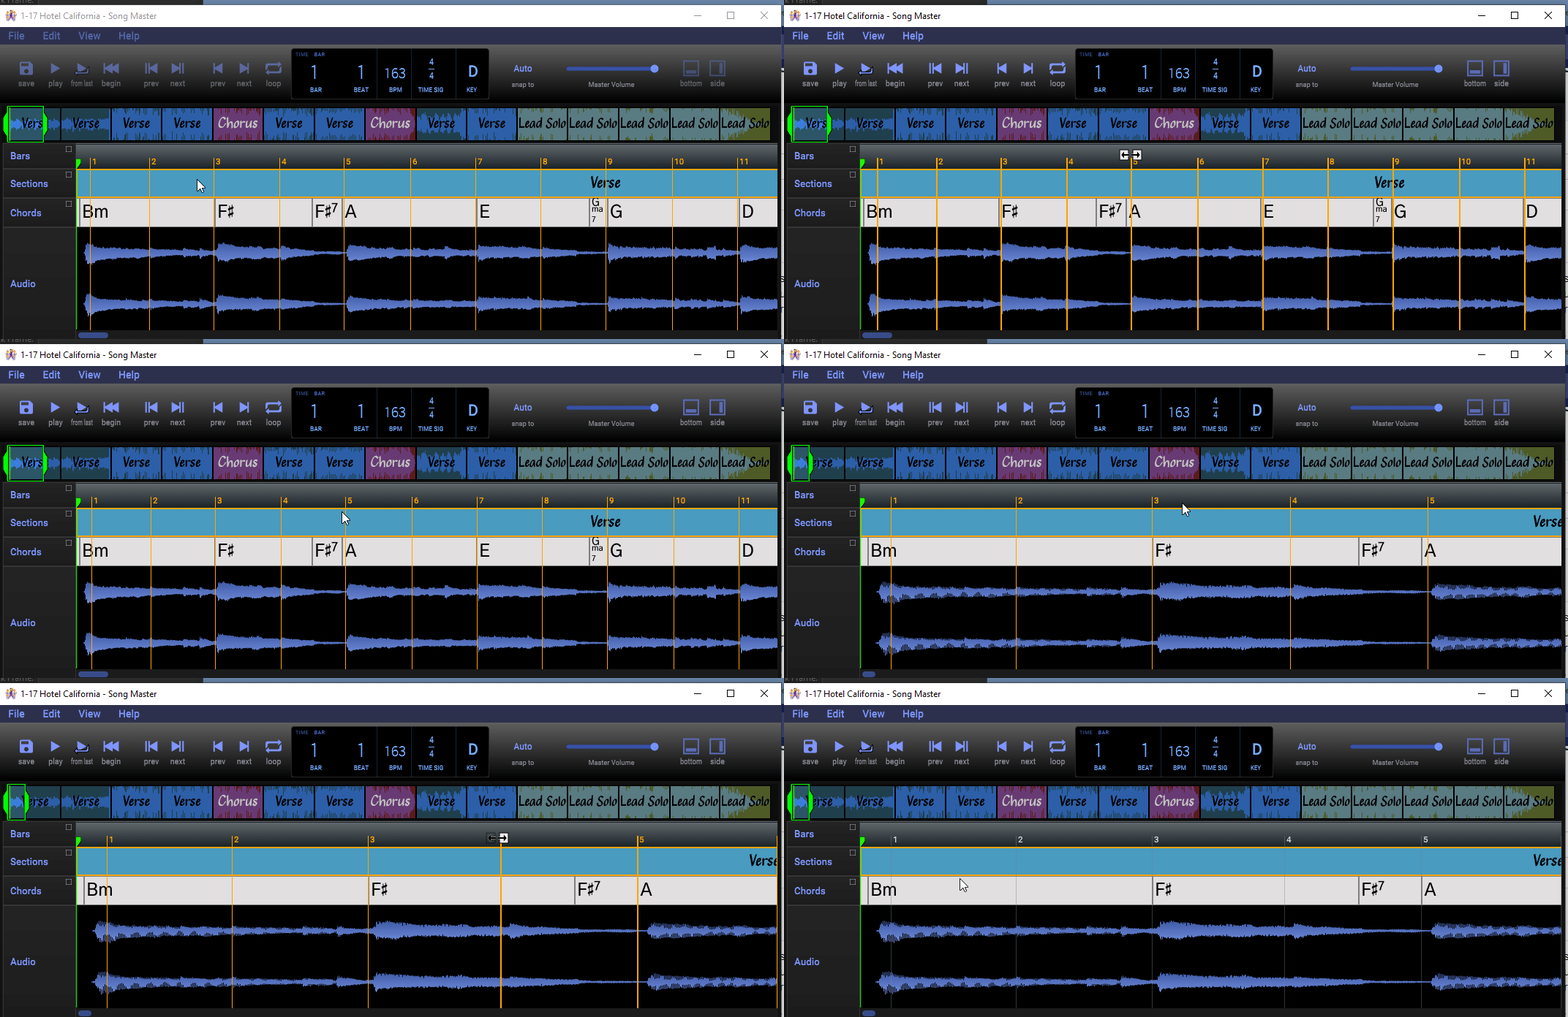
When you are finished editing the bar lines, be sure to exit edit mode by unchecking "Edit bar times" in the menu.
If the song has a Fixed BPM
If you are positive that the song uses a fixed bpm, you can replace all of the analyzed bar positions with bars using a fixed BPM.
You Know the BPM
Click the BPM displayed in the Control bar and type the desired bpm followed by Enter. A dialog is displayed to confirm that you want to change ALL bar lines to a fixed bpm. These actions are demonstrated below:
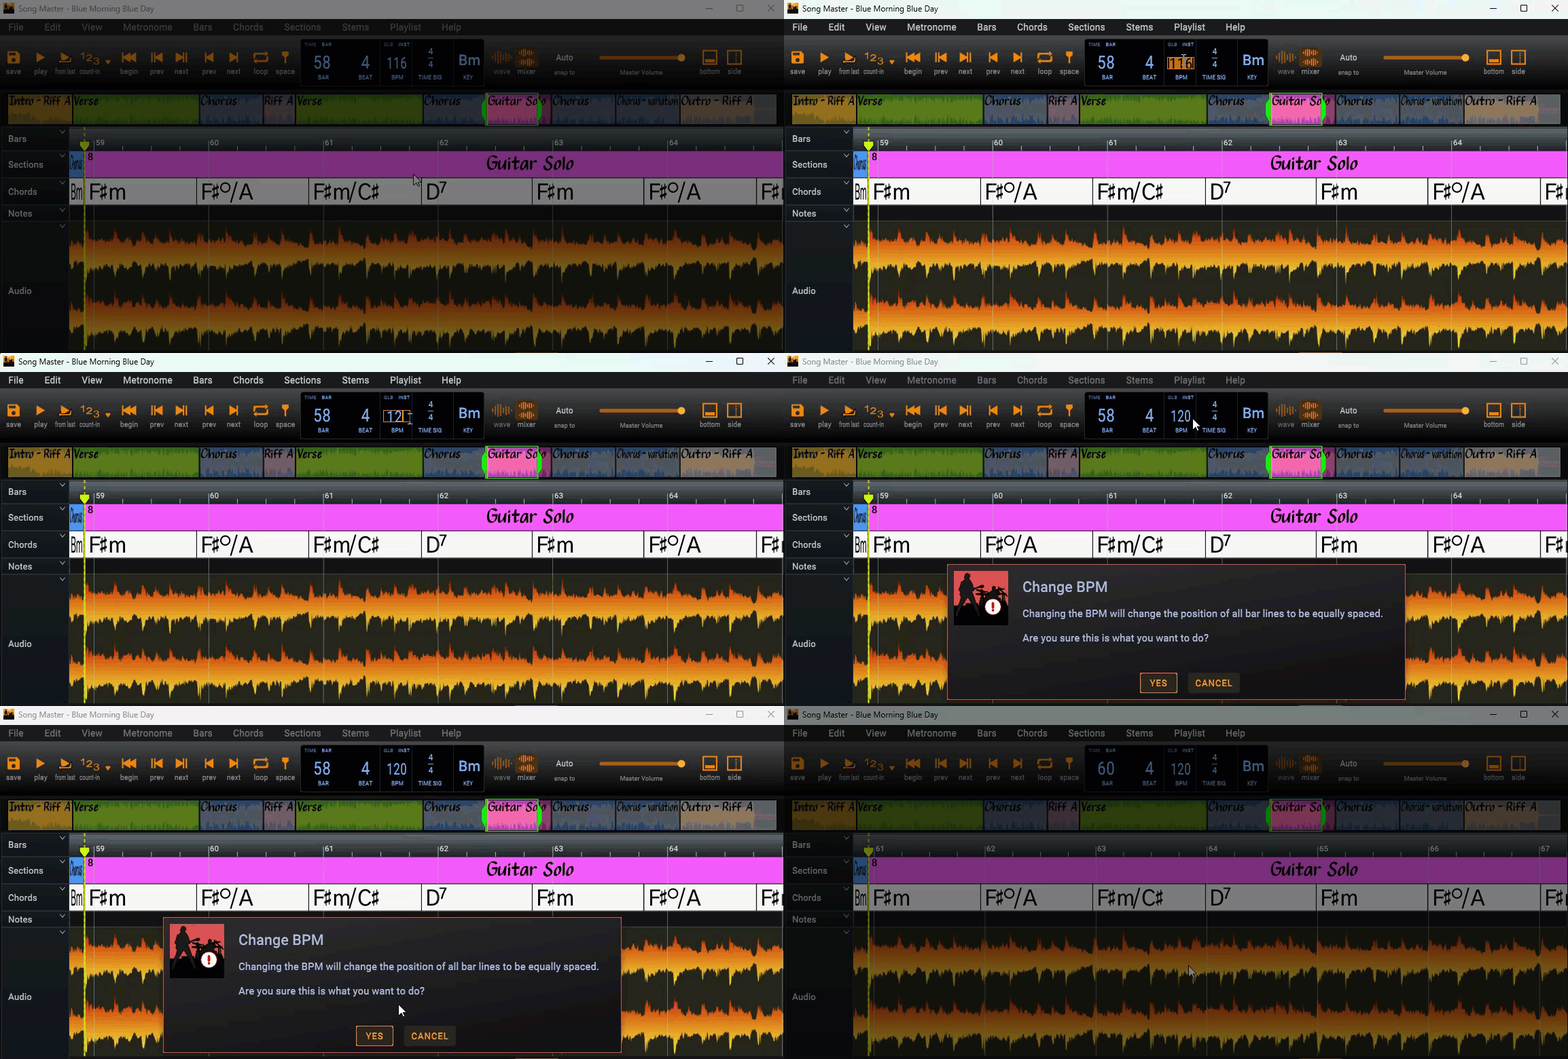
If the results are not what you like, you can Undo and try again.
Visually changing the BPM
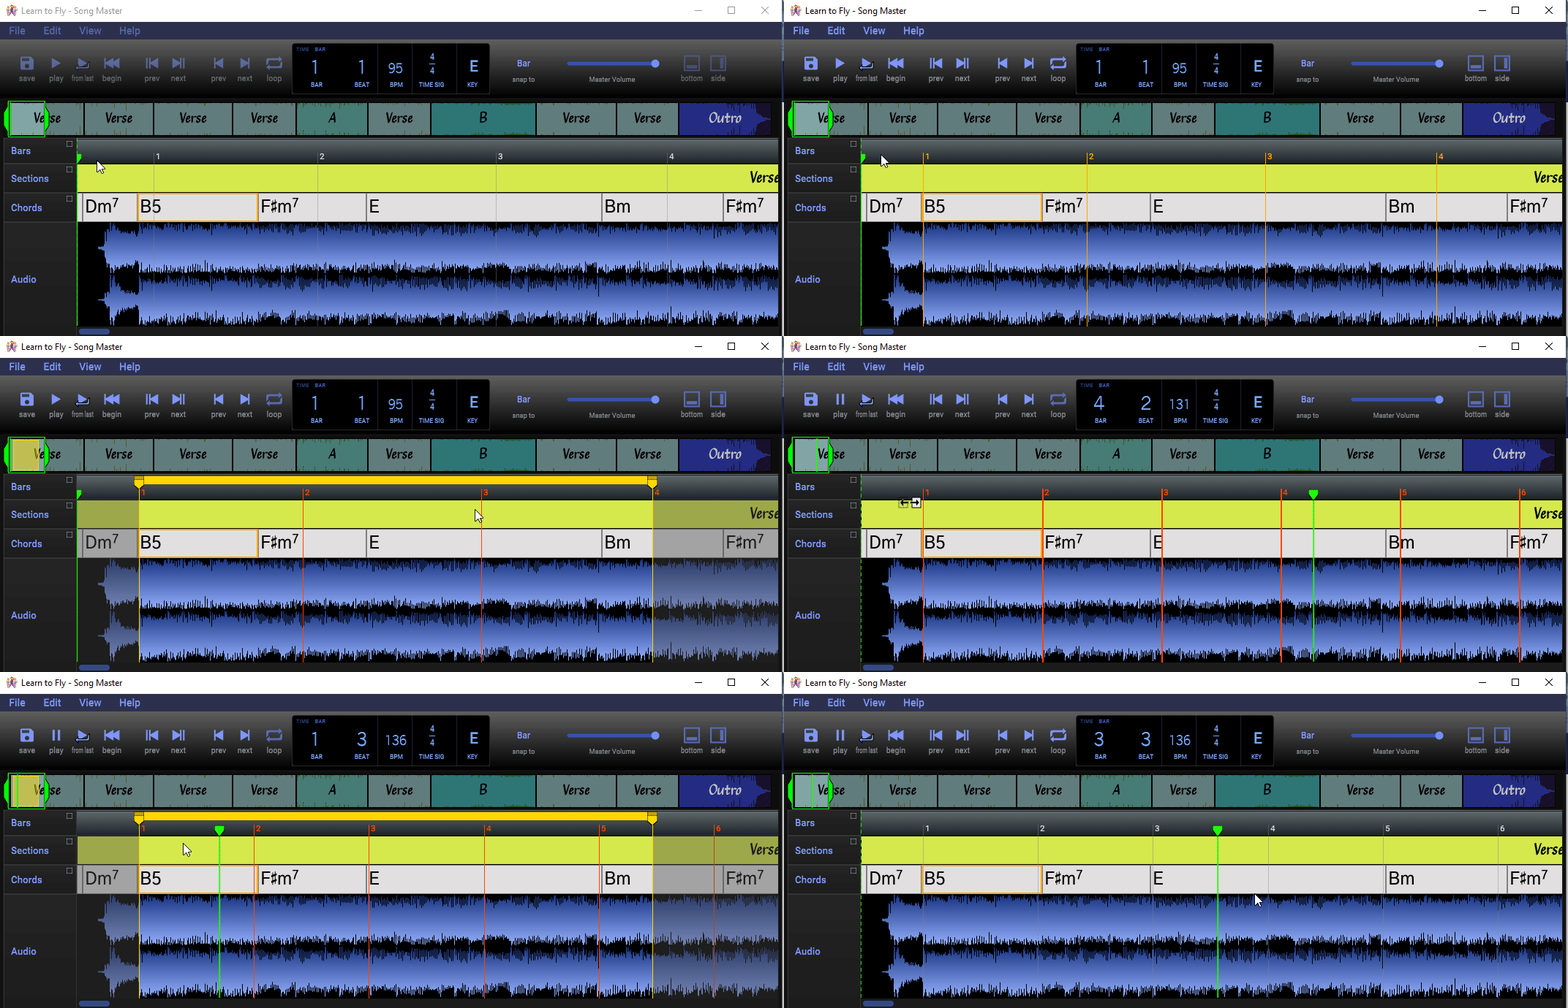
Similar to Edit bar times, the Edit as fixed BPM mode allows you to adjust bar spacing starting at any bar line. This option is best illustrated in action as shown below. Since we'll be following a typical sequence of actions, we''ll enumerate the steps for your reference.
- enter Edit bar times mode and position bar 1 to the first down beat
- enter Edit as fixed BPM mode. If the song you are editing isn't crushed by a limiter you may be able to visually see in the waveform where the beats are and use them to make the necessary adjustments. However, in this example, it'll be easier to adjust it aurally.
- create a loop region over several bars and make sure the entire loop is visible (this will allow us to iteratively refine the bar placement, and prevent scrolling). Even though we create a loop region, the changes will still be applied to the entire song.
- enable the metronome by pressing m. The metronome will give us an aural clue that we will want to have line-up with the beats in our song. Make sure you can clearly hear the metronome. If necessary, you can turn down the volume of the song by using the song's volume on the Tools Panel.
- Press space to start playing the loop region.
- We want to use bar 1 as our anchor so we click and drag bar 2. As bar 2 is moved, all the bars following it are modified to keep the bpm constant.
- If you are visually aligning the beats to waveform peaks then make sure that the playhead marker is positioned at or after bar 1. If it isn't click in the waveform where bar 1 is located to position the playhead to bar 1. This allows you to watch the BPM displayed in the Control bar as you make your adjustments (the BPM displayed is always the BPM at the location of the playhead marker).
- When we are satisfied with the results, uncheck Edit fixed BPM in the menu.
Add and Delete a Bar
Adding a bar is usually not something you would want to do in most cases. Instead you may want to add Time Signatures which will add a bar and change the number of beats in the bar(s).
To Add a bar, right-click at the place you want to add the bar and select Add a bar from the pop-up menu. If you need to re-position the bar, enter Edit bar times mode, then Shift+drag to adjust it's position, exit Edit Bar times mode.
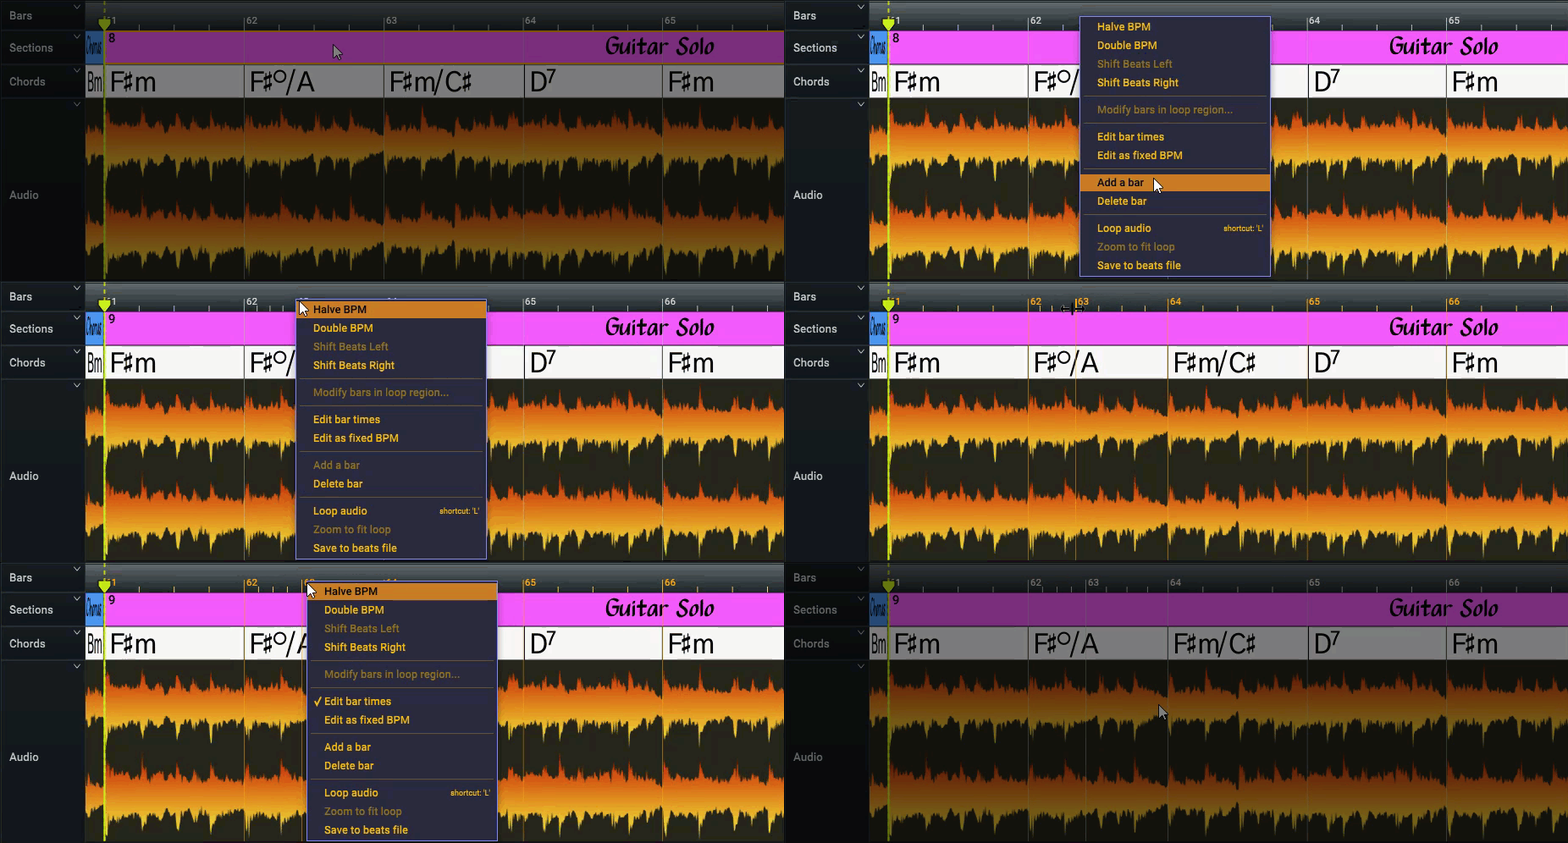
To delete a bar, right-click on the bar you want to delete and select Delete bar from the pop-up menu.
Reset the Bars
You can always go back to the original bars computed by having Song Master re-analyze the song. Go to the Analyzers tab and click the Analyze button.
