Controllers Track (PRO)
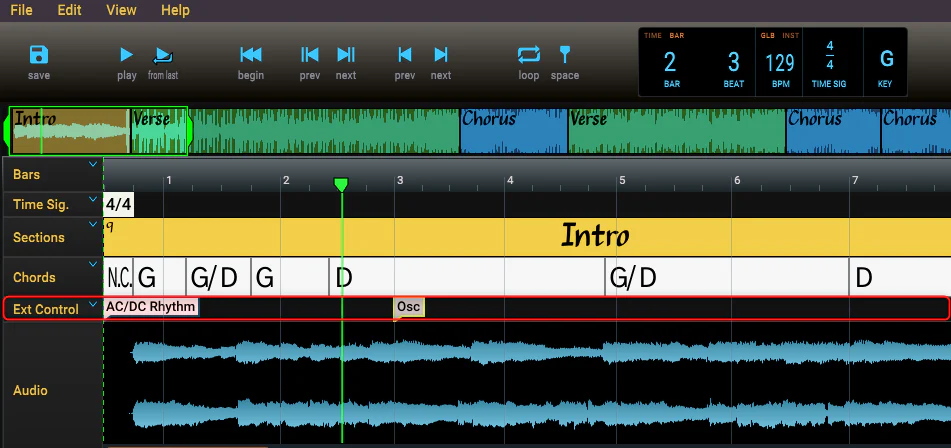
The Controllers track allows you to send MIDI and OSC messages to applications and external devices. This allows you to, for example, send patch-changes to your music applications and devices such as the AXE FX, Kemper profiler, Line 6 and Boss 6 multi-fx pedals, and any other pedal that supports MIDI. If you have an application acting as an OSC server, you can use the Controller track to send OSC messages to control the application.
For information on setting up MIDI devices please view Set up to Send MIDI Messages and for OSC please view Set up to Send and Recevie OSC Messages
Sending Messages to an External Device or Application
Controller messages may be added at any time in a song. Usually, you'll want to send a message at the start of a song and then optionally, at Verse, Chorus, and/or Solo sections.
If the Ext Control track is not shown, select Ext Controller track from the View menu.
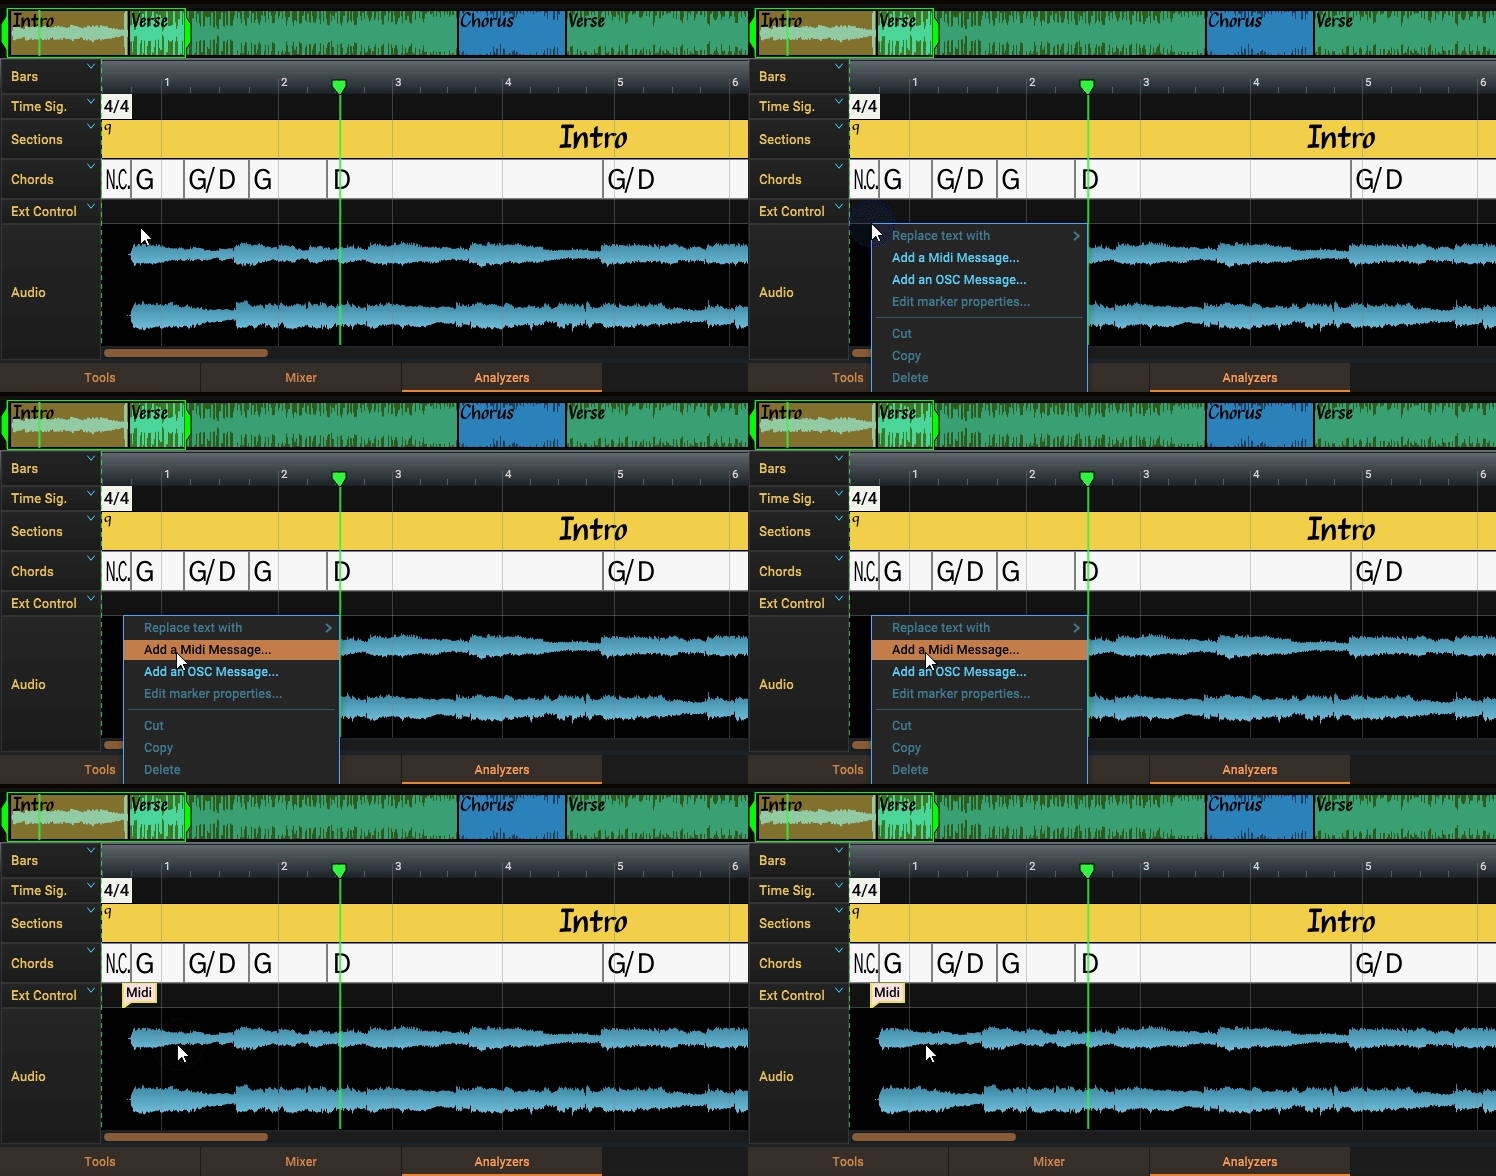
To add a MIDI message, double-click in the Ext Control track at the time that you want to send the message. You can also right-click on the track and select Add a Midi message... or Add an OSC message... to add an OSC message:
Editing MIDI Messages
To edit a Controller marker, simply double-click the marker. The marker editor for MIDI messages includes fields for entering a name for the marker, a background color, and additional fields for defining the MIDI message:
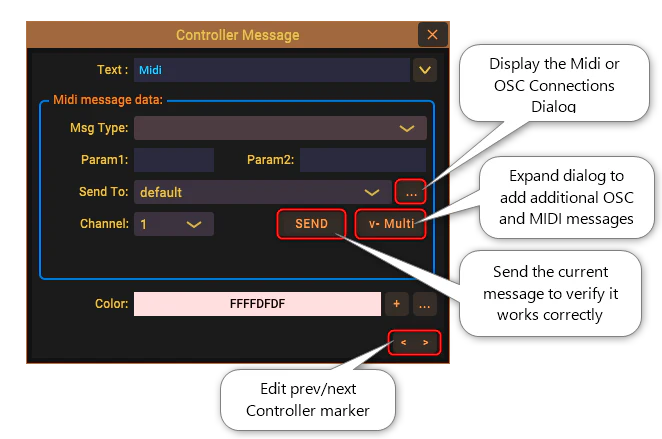
Notice that the MIDI specific data is enclosed in a blue box; when editing an OSC message, the box is colored green.
Use the Text field to change the text displayed on the marker. Usually, you will want to enter a short description of what this marker does (i.e. "Distortion", or "Elec Piano").
Msg Type
Next, click the Msg Type dropdown and select a message type. This will modify the data shown in the other fields. Song Master can send Program Change, Controller, Note On, and Note Off messages.
A Program Change message allows you to specify the program and bank numbers of the program you want to switch to. Program change numbers (sometimes referred to as presets) depend on the device so you will need to refer to the device's manual. The MIDI specification allows program numbers to range from 0 to 127, however, since most devices have more than 128 presets, you need to specify which block of 128 presets to use by specifying the Bank #.
If you enter a program change number larger than 127, Song Master will calculate the appropriate bank change number for you!
Select Control Change for the Msg Type if you want to send a control message to your device. When Control Change is selected, the two fields below it allow you to enter the CC number and the Value. You will need to check your device's manual for the CC numbers it recognizes.
Selecting Note On and Note Off will send the MIDI message to start playing and stop playing, respectively, a given note. Specify the note number to play and its velocity in the two data fields under the Msg Type dropdown.
Midi allows a message to be sent to one of 16 midi channels. Usually you can just specify channel 1.
Select the Device/App to Send the Message to
The Send To dropdown is where you select the MIDI device to send the message to.
If the device isn't listed in the dropdown, click the ... button to the right of the dropdown to display the Midi Connections dialog. Click the Add Connection button. Then in the added connection row, enter a descriptive name, then select the midi device from the dropdown, and finally, select the midi channel. For details, refer to the article Set up to Send MIDI Messages.
Test Send the Message
Use the Send button to send your defined MIDI message to your device and verify it does what you intended.
When you are finished editing, close the dialog by clicking the 'X' in the dialog's title bar.
MIDI Message Example
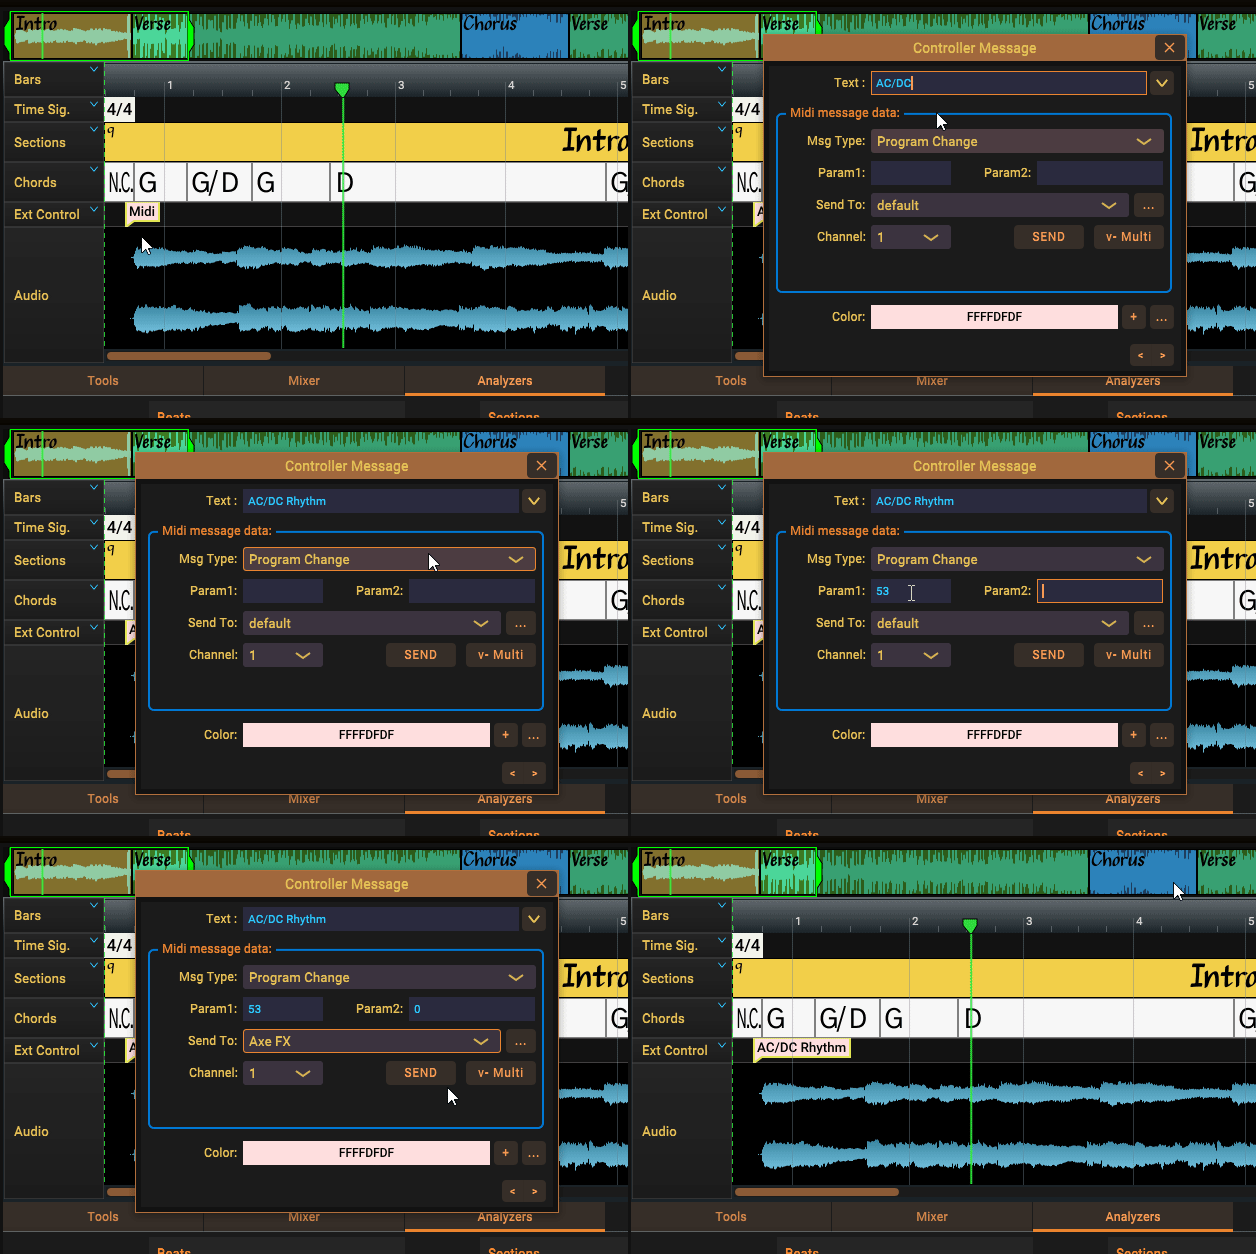
In the short video below, we will have Song Master send a program change message to our guitar processor that will have it change to our AC/DC rhythm guitar sound. In the video we do the following:
- Double-click the marker to open the marker editor.
- Name the marker "AC/DC rhythm" to tells us what it does.
- Set the Msg Type to Program Change.
- In our guitar processor, we have an AC/DC sound at preset 53. (note that the MIDI spec uses the number 0 to represent the first program/preset; if your device numbers presets starting with 1 you may have to subtract one from the preset number that you enter in)
- Song Master has set the Bank# to 0 (since our program/preset is less than 128). If you need to specify another bank, enter it now.
- In the Send To field, we select the name of our device.
- Finally, click the Send button to verify that we've entered everything correctly.
Editing OSC Messages
Editing an OSC message is similar to editing a MIDI message. After we've created an OSC message marker by right-clicking in the Controller track and selecting "Add on OSC Message", we can edit it by double-clicking the marker.
Enter the OSC Address
An OSC address is like the name of the command you want to have an external application run. It is specified in a manner similar to file paths and must begin with a slash "/". You need to refer to the application's OSC documentation for details on the names and parameters required for the OSC messages they respond to. There is no "standard" set of OSC address names, each application must define the names they want to use.
An OSC address will have zero or more data parameters associated with it. The OSC Data editor allows you to specify the values for these parameters. After entering a parameter you must hit the enter key to mark the end of that parameter.
Just like for MIDI messages, select the app to send the message to from the Send To dropdown. Press the Send button to send the OSC message to the application and verify that it worked correctly.
OSC Message Example
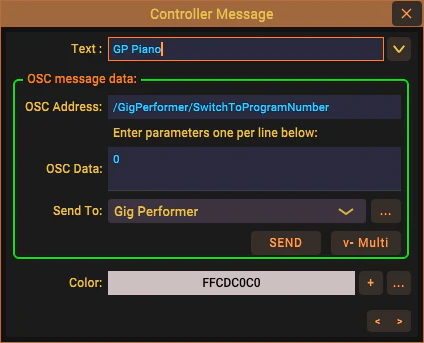
In the screen shot below, we have defined an OSC message that will be sent to another application ('Gig Performer' in this example) that we are using to host our keyboard plugins. Each OSC message must have an OSC Address that tells the application what you want it to do (you can think of an OSC Address as the name of the command you want it to do). In this example the one we want is named /GigPerformer/SwitchToProgramNumber". This works in a similar way as the Midi message example above, and tells Gig Performer that we want to activate the first (0) preset (called a "rackspace" in the Gig Performer vernacular) that we setup in that application.
To Send Multiple Messages at a Given Time
You can send multiple messages (either Midi, OSC, or a combination) by clicking the v-Multi button to expand the dialog and expose the message list box.
In the video below, we add another MIDI and OSC message to an existing Controller marker. Click the Add MIDI button to add a MIDI message, or click Add OSC to add an OSC message. Select a message in the list to edit it. You can rearrange the order by dragging rows as needed.
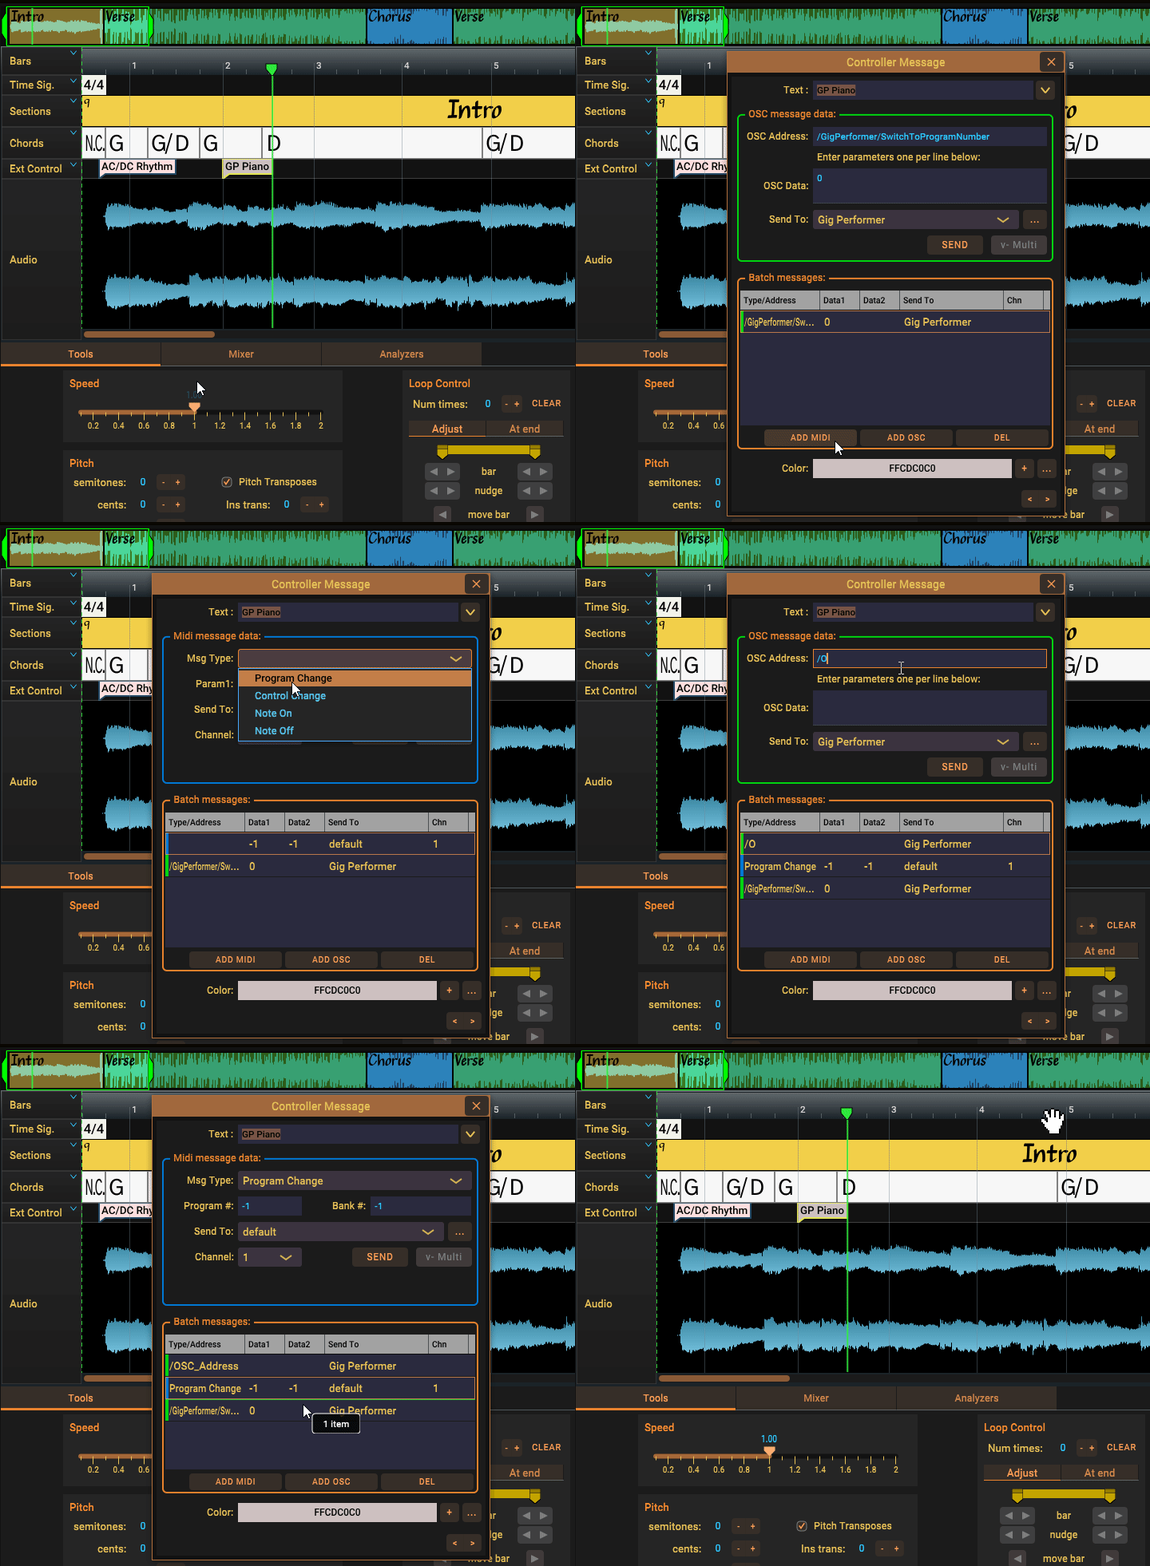
Depending on your use, the order of messages sent may be important. If this is the case, then click-and-drag a row in the list to the desired order.